
Mastering Microscopy and Cell Structure: Common OCR A Level Biology Questions Answered
Prior Knowledge to Recap
Before diving into microscopy and cell structure, make sure you're confident with these key concepts:
• Basic cell structure – understanding the difference between prokaryotic and eukaryotic cells, and being able to identify major organelles like the nucleus, mitochondria, and chloroplasts
• Units of measurement – being confident with converting between millimetres (mm), micrometres (μm), and nanometres (nm) is essential for magnification calculations (1mm = 1000μm, 1μm = 1000nm)
• The concept of magnification – knowing that magnification = image size ÷ actual size, and being able to rearrange this formula
• Resolution versus magnification – understanding that magnification makes things appear larger, whilst resolution is the ability to distinguish between two separate points
• Light and lenses – appreciating how light microscopes use glass lenses to magnify specimens, and that electron microscopes use electrons instead of light
Links to GCSE Content
This topic builds directly on your GCSE Biology knowledge:
• Using a light microscope – at GCSE you learned to use a light microscope to observe cells; now you'll learn about different types of microscopes (electron microscopes and laser scanning confocal microscopes) and their specific applications
• Animal and plant cells – GCSE covered basic cell structures visible under a light microscope; A level explores the much higher resolution images from electron microscopes that reveal ultrastructure
• Preparing slides – you may have prepared simple slides at GCSE; A level requires precise techniques for slide preparation, staining methods, and understanding why specific procedures are used
Common Question Types and How to Answer Them
Let me walk you through five frequently asked questions from past OCR papers, showing you exactly what examiners are looking for.
Question 1: Preparing a Blood Smear (Practical Technique)

How to approach this question:
This is testing your practical knowledge of slide preparation – a key skill in microscopy. The examiners want to see that you understand the precise method, not just vague statements.
Model Answer using markscheme points:
"Use pipette to place blood (sample) on slide" ✓
"(Place blood) near one end (of slide)" ✓
"Use (2nd) slide/cover slip to spread/smear blood across slide" ✓
"Slide/cover slip at an angle" ✓
(Award 3 marks maximum from these points)
Markscheme guidance - What to write:
You can answer using an annotated diagram if you prefer
ACCEPT "smear" as equivalent to "spread"
For additional valid point (AVP): ALLOW "allow to (air) dry"
What NOT to write:
Don't describe staining procedures – the question says the smear will be stained later
Don't talk about focussing the microscope – that's outside the scope of this question
Examiner insight from markscheme:
"Most candidates scored at least one mark on this question, usually marking point 1, and many achieved all 3. Marking points 3 and 4 were also frequently given. No credit was given for describing staining or focussing as these were outside the scope of the question."
Key technique points to remember:
The blood smear technique is specific:
Small amount of blood placed near one end of the slide
Second slide held at an angle (typically 30-45°)
Pushed/dragged across the first slide to create a thin smear
This creates a monolayer of cells that can be examined individually
Why this technique matters:
Creates a thin enough layer for light to penetrate
Allows individual cells to be distinguished
Prevents cells from overlapping
Question 2: Comparing Microscope Resolution

Answer: A ✓
Why this is correct:
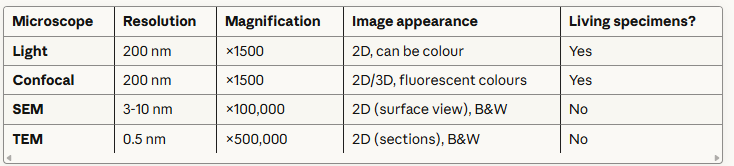
You need to know the resolution of each microscope type (this is examined frequently!):
Microscope Type Maximum Resolution Light microscope 200 nm (lowest) Laser scanning confocal microscope 200 nm (same as light) Scanning electron microscope (SEM) 3-10 nm Transmission electron microscope (TEM) 0.5 nm (highest)
Therefore the correct order from LOWEST to HIGHEST resolution is:
Light microscope (200 nm) → Scanning electron microscope (3-10 nm) → Transmission electron microscope (0.5 nm)
Common mistakes:
Students often confuse:
Resolution with magnification (they're different things!)
The two types of electron microscope
Laser scanning confocal with electron microscopes
Key distinction:
Scanning Electron Microscope (SEM):
Scans surface of specimens
Produces 3D images
Resolution: 3-10 nm
Transmission Electron Microscope (TEM):
Electron beam passes through thin specimens
Produces 2D images
Highest resolution: 0.5 nm
Can see internal structures (ultrastructure)
Memory aid: "TEM is Top for resolution, SEM is for Surfaces"
Question 3: Completing a Microscope Comparison Table

Correct Answers:
Image appearance 2D / 3D 2D ✓ 2D ✓
Image colour named colour/coloured ✓ black and white ✓ black and white
(Mark each row)
How to work this out:
Row 1: Image appearance
SEM produces 2D images (despite showing surface detail that looks 3D)
TEM produces 2D images (flat sections through specimens)
The markscheme awards 1 mark for this row
Row 2: Image colour
Laser scanning confocal uses fluorescent dyes → coloured images
Both electron microscopes produce black and white images originally
The markscheme awards 1 mark for this row
Important clarifications:
Why does SEM image appearance = 2D?
This confuses many students because SEM images look 3D. However:
The data captured is 2D (a flat image)
The depth perception comes from shading and shadows
Technically it's a 2D representation of a 3D surface
Some markschemes accept "3D" for SEM, but this one specifically wants "2D"
What about confocal image colour?
The markscheme accepts:
Named colour (e.g., "green", "red")
"Coloured" (general term)
Confocal microscopes use fluorescent tags that emit specific colours

Question 4: Identifying Biological Drawing Errors

Part (i): Identify ONE incorrect label and explain your answer. (3 marks)


Model Answer using markscheme:
Incorrect label: ribosome ✓
Explanation:
"Cannot see with this/light microscope" ✓
"(Light microscope) resolution not high enough/too low" ✓
OR
"(Light microscope) magnification not high enough/too low" ✓
"It is a nucleus" ✓
Markscheme guidance - What to write:
ALLOW "not visible/cannot be viewed/detected" for "see"
ALLOW "resolution not sharp/clear/strong/detailed enough"
What NOT to write:
Don't just say "structure shown too large" – need to explain why it can't be seen
Don't say resolution is "strong" or "weak" – use "high" or "low"
Why ribosomes can't be seen with a light microscope:
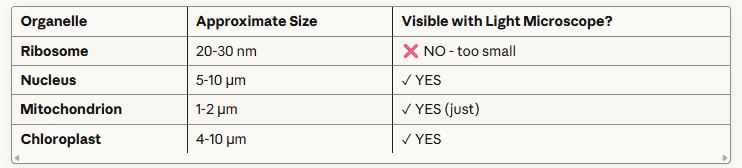
The limiting factor:
Light microscope resolution = 200 nm
This means two points closer than 200 nm apart cannot be distinguished
Ribosomes (20-30 nm) are much smaller than this limit!

Examiner insight from markscheme:
"any three from:
label lines should not cross ✓
no arrowheads ✓
no shading/colouring in ✓
give magnification/scale ✓
give title ✓
draw cell walls as two lines ✓
draw organelles in proportion ✓
(Award 3 marks maximum)"
Markscheme guidance:
ALLOW "must be parallel" (for label lines)
ALLOW "give diagram a name" (for title)
ALLOW reference to "nuclei/structures labelled as ribosomes, too big"
The rules for biological drawings:
✓ DO:
Use a sharp pencil
Draw continuous, clear lines
Draw label lines with ruler (straight, not crossing)
Draw in proportion to what you see
Include title and magnification
Draw cell walls as double lines (showing thickness)
✗ DON'T:
Use shading, colouring, or sketchy lines
Add arrowheads to label lines
Draw things you can't actually see
Make structures disproportionately large or small
Common marking points students miss:
Many students know about "no shading" and "sharp pencil" but forget:
Magnification must be stated
Title should identify the specimen
Proportion is critical – organelles must be correctly sized relative to the cell
Question 5: Why Cells Need to Be Stained

Model Answer using markscheme:
"Create/provide/increase contrast" ✓
"Make cells/(named) component(s) visible" ✓
OR
"Cells/(named) components can be identified/distinguished/differentiated" ✓
(Award 2 marks for a complete explanation)
Markscheme guidance - What to write:
ACCEPT "(named) organelle(s) stand out from surroundings"
ACCEPT "regions/parts/AW of cell"
What NOT to write:
Don't just say "clearer" – this is too vague (IGNORE according to markscheme)
Examiner insight:
"Most candidates knew that staining made cell components visible and many also understood that the stain increases the contrast."
Why staining is necessary:
The problem with unstained cells:
Most cells and their components are transparent or translucent when viewed under a light microscope because:
Cell structures are mostly made of water, proteins, and lipids
These materials don't absorb much light
Little contrast exists between different structures
The cytoplasm and organelles look similar
What staining achieves:
Increases contrast between different structures
Makes specific components visible that would otherwise be transparent
Allows differentiation between cell types
Enables identification of particular organelles or structures
Different types of staining:
Simple staining:
Uses one dye
All cells/components stained the same colour
Example: Methylene blue stains all cells blue
Differential staining:
Uses multiple dyes
Different components stain different colours
Allows identification of specific structures
Common stains you should know:

How stains work:
Stains are typically charged molecules that bind to oppositely charged components:
Positively charged dyes (e.g., methylene blue) bind to negatively charged DNA/RNA
Negatively charged dyes (e.g., eosin) bind to positively charged cytoplasmic proteins
Additional Question: Improving Slide Preparation


Describe TWO ways in which this procedure could be improved. (2 marks)
Model Answers using markscheme (award 2 marks maximum):
"Place stain at edge of sample (not the centre)" ✓
"Lower cover slip at an angle/use mounted needle" ✓
"Use blotting paper to remove excess stain/pull stain through" ✓
"Use more than one stain (to improve contrast)" ✓
Markscheme guidance - What to write:
Mark as prose (not bullet points required)
IGNORE "use forceps/lay sample flat"
ALLOW "place stain at side of sample"
ALLOW stated angles given e.g., 45°
ALLOW "tissue/paper towel instead of blotting paper"
ALLOW "ensure stain covers whole sample"
What NOT to write:
Don't mention aseptic technique (not relevant here)
Don't talk about adding water
Don't mention wearing gloves
Don't mention pressing down on cover slip to remove air bubbles
Examiner insight:
"Candidates who had a practical knowledge of slide preparation scored well, mentioning lowering the cover slip at an angle or using blotting paper to remove excess stain, as ways to improve the method. However, many candidates wrote about aseptic technique, adding water, wearing gloves, or pressing down on the cover slip to remove air bubbles, which gained no credit."
The correct staining technique:
Step 1: Position the stain correctly
Place stain at the edge of the sample (not in the centre)
This allows stain to diffuse through the sample evenly
Step 2: Lower cover slip at an angle
Hold cover slip at approximately 45°
Touch one edge to the slide first
Slowly lower the opposite edge
This prevents air bubbles from being trapped
Step 3: Draw stain through (optional but better)
Place blotting paper on opposite side of cover slip
The paper draws stain through by capillary action
Removes excess stain
Creates even distribution
Step 4: Remove excess stain
Use blotting paper around edges
Prevents background staining
Creates clearer image
Why each step matters:

Top Tips for Exam Success Based on Markscheme Guidance
1. Practical technique questions need SPECIFIC detail:
✓ "Place blood near one end of slide"
✗ "Put blood on slide" (too vague)
2. Know your microscope specifications:
3. For biological drawing questions:
Remember the 7 key rules:
Sharp pencil, clear continuous lines
No shading or colouring
Label lines straight (with ruler), no arrowheads
Draw in correct proportions
Include title (identifying specimen)
Include magnification/scale
Only draw what you can actually see
4. Understand the difference between:
Resolution = The ability to distinguish between two separate points
This is fixed for each microscope type
Cannot be adjusted by the user
Determined by the wavelength of light/electrons used
Magnification = How much larger the image appears compared to actual size
Can be changed by using different objective lenses
Formula: Magnification = Image size ÷ Actual size
Not the same as resolution!
5. Staining questions - key points:
When asked "Why stain cells?":
Always mention "increase/provide contrast"
State that it makes cells/specific components visible
Can mention identification/differentiation of structures
When asked about staining method:
Stain at edge not centre
Cover slip at an angle
Use blotting paper for excess
May use multiple stains for differential staining
6. Common mistakes to avoid:
Common Error Why it's wrong Correct answer "Staining makes cells clearer" Too vague "Staining increases contrast between structures" "High magnification gives better resolution" Magnification ≠ resolution "Electron microscopes have higher resolution than light microscopes" "Ribosomes can be seen with light microscope" Too small (20-30 nm) "Ribosomes cannot be seen - below 200 nm resolution limit" "SEM images are 3D" Technically 2D data "SEM produces 2D images of surfaces" (though may appear 3D)
Understanding Examiner's Comments from Markschemes
The markschemes include valuable "Examiner's Comments" that reveal common mistakes. Here are the most important ones for this topic:
On blood smear preparation (Q1): "No credit was given for describing staining or focussing as these were outside the scope of the question."
Lesson: Read the question carefully - only describe what's asked for!
On pond water slide preparation (Q2a): "Many answers discussed improving the method in terms of not pouring the pondwater on the slide but suggested a smear approach, not appreciating that a smear would effectively be a dried sample that would not be appropriate to observe the contents of pond water."
Lesson: Different specimens need different preparation methods!
Misconception highlighted: "Many candidates believe that dyes are required to see anything using a light microscope. Dyes are required to distinguish cell types and subcellular structures. Organisms can be seen under a light microscope without the need for a colour contrast."
Lesson: Staining improves visibility and increases contrast, but isn't always essential to see something
On biological drawings (Q9): "Some answers discussed the label lines and lack of arrow heads as a piece of evidence without appreciating the question refers to both figures to support the student's statement and not just a list of rules for a good biological drawing."
Lesson: Always relate your answer to what the question is specifically asking
On staining procedures (Q10iv): "Candidates who had a practical knowledge of slide preparation scored well... However, many candidates wrote about aseptic technique, adding water, wearing gloves, or pressing down on the cover slip to remove air bubbles, which gained no credit."
Lesson: Practical experience is invaluable! But always focus on what's relevant to the question
Practice Strategy
To master this topic effectively:
1. Get hands-on practical experience
Actually prepare slides yourself - blood smears, pond water, onion cells
Practice using a light microscope with different objective lenses
Try different staining techniques
2. Make comparison charts Create a detailed table comparing all microscope types - this is tested repeatedly
3. Practice biological drawings
Draw from real microscope images (not from textbooks)
Follow all 7 rules strictly
Get feedback from your teacher
4. Learn the specifications exactly
Memorise the resolution values for each microscope type
Know which produces 2D vs 3D images
Understand colour vs black and white images
5. Use the markschemes
Read the "What NOT to write" sections carefully
Understand why certain answers don't get credit
Learn from the Examiner's Comments
6. Link practical to theory When you do a practical, ask yourself:
Why am I using this technique?
What would happen if I changed this step?
How does this relate to the microscope's limitations?
Quick Reference Guide
Resolution (lowest to highest): Light (200 nm) → SEM (3-10 nm) → TEM (0.5 nm)
Magnification (lowest to highest): Light (×1500) → SEM (×100,000) → TEM (×500,000)
Image appearance:
Light/Confocal: 2D or 3D
SEM: 2D (of surfaces)
TEM: 2D (of sections)
Image colour:
Light: Natural or with stains
Confocal: Fluorescent colours
SEM & TEM: Black and white
Can use with living specimens:
Light: YES
Confocal: YES
SEM: NO (vacuum, coated)
TEM: NO (ultra-thin sections)
The 7 rules of biological drawing:
Sharp pencil, clear lines
No shading/colouring
Straight label lines, no arrows
Correct proportions
Title included
Magnification stated
Draw only what's visible
Why cells are stained:
Increase/provide contrast
Make cells/components visible
Enable identification/differentiation
Remember: examiners reward precision, practical knowledge, and correct terminology. The difference between a good answer and a great answer often lies in the specific details you include!
Good luck with your revision! 🔬🧫